14 October 2026
The Ultimate Coffee Bloom Guide for Better Brewing
Presented by @sessioncoffeedenvercoffeepress
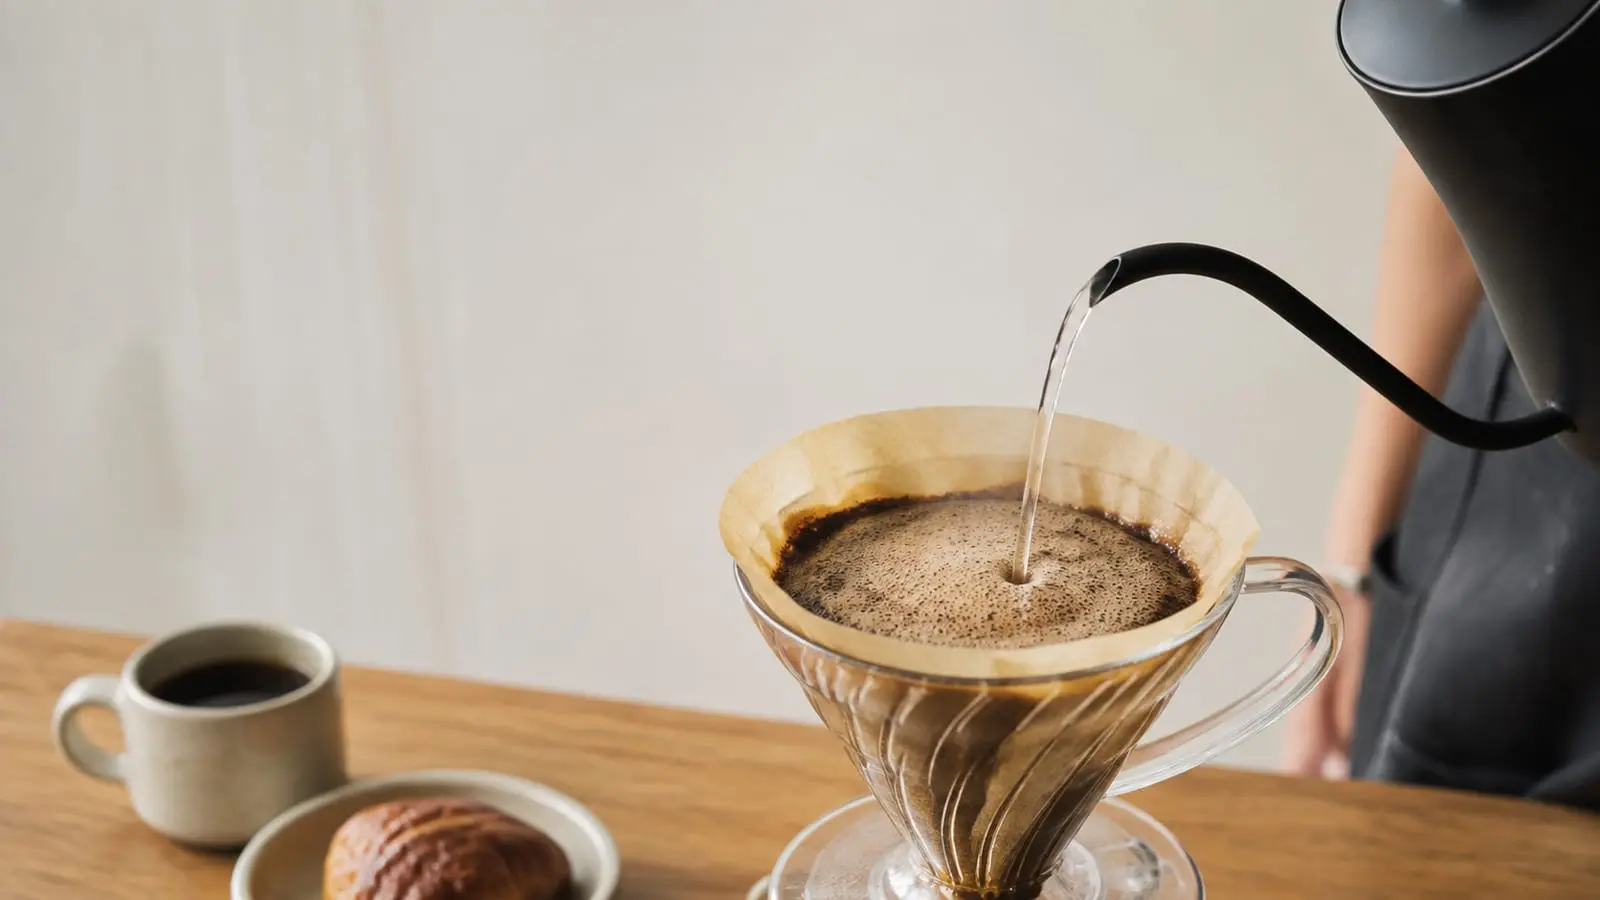
If you have ever watched freshly ground coffee hit hot water and seen it puff up like a tiny volcano, you have witnessed the bloom. That brief, bubbling release of gas is one of the most telling moments in brewing. It signals freshness, affects extraction, and can make the difference between a flat cup and a vibrant one. Over the years I have dialed in dozens of recipes, and the bloom is always where I start when something tastes off.
Before we get into technique, it helps to understand what is actually happening. Coffee beans contain carbon dioxide, trapped inside their cellular structure after roasting. As the beans age, that gas slowly escapes. When you grind the beans, you create new surface area, and the CO2 rushes out even faster. Hot water accelerates the process, forcing the gas to release in a sudden burst. That is the bloom. If the coffee is very fresh, the bloom is vigorous and lasts longer. If the coffee is stale, the bloom is weak or nonexistent.
Why the Bloom Matters for Flavor
The bloom is not just a visual trick. It directly affects how evenly your coffee extracts. When CO2 escapes, it creates channels in the coffee bed. Water follows those channels, and if too much gas is still trapped, the water can bypass some grounds entirely. That leads to under-extraction, sourness, or a thin mouthfeel. By letting the bloom finish before you pour the rest of your water, you give the gas a chance to leave, so the water can saturate the grounds evenly.
This matters most for pour-over methods, where you control the pour. With a French press or an Aeropress, the bloom is still important, but the mechanics are different. In a French press, you stir the grounds during the bloom, which helps release gas and ensures even wetting. With an Aeropress, the bloom is shorter because the immersion time is short overall. But skipping the bloom in any method means leaving flavor locked inside the grounds.
I have run side-by-side tests with the same coffee, same grind, same water temperature. One batch got a proper 30-second bloom; the other got none. The bloomed cup was noticeably sweeter and cleaner. The unbloomed cup tasted flat, with a lingering astringency. That test convinced me that the bloom is not optional. It is a foundational step.

How to Bloom Coffee: The Basics
The standard recommendation is to use twice the weight of the coffee in water. For example, if you are brewing 20 grams of coffee, pour 40 grams of water over the grounds. Let it sit for 30 to 45 seconds. Then continue with your regular pour.
But the exact time and ratio depend on the coffee. Freshly roasted coffee, within a week or two of the roast date, blooms more aggressively. You might want to extend the bloom to 45 seconds or even a full minute. Older coffee, three or four weeks past roast, will bloom less. You can shorten the bloom to 20 or 25 seconds. The key is to watch the bed. When the bubbling subsides and the crust settles, the bloom is done.
Water temperature also plays a role. Hotter water, around 205 to 210 degrees Fahrenheit, speeds up the gas release. Cooler water, around 195 degrees, slows it down. If you are using a light roast, which is denser and harder to extract, a hotter bloom can help break through. For darker roasts, which are more soluble, a slightly cooler bloom gives you more control and reduces bitterness.
Common Mistakes and How to Fix Them
One mistake I see often is pouring the bloom water too aggressively. If you pour hard, you disturb the coffee bed and create uneven extraction. You also push water through the grounds before the gas has fully released. The result is a muddy, inconsistent brew. Instead, pour gently, in a circular motion, making sure all the grounds are wet. Then let it sit.
Another mistake is not stirring during the bloom. For pour-over, some brewers recommend a gentle stir with a spoon or a chopstick. This helps break up clumps and ensures every particle is saturated. I find it helps most with very fresh coffee, where the gas can form a thick crust that traps dry grounds underneath. A quick stir releases that gas and lets the water reach the bottom of the bed.
A third mistake is using too little water for the bloom. If you use less than a 1:1 ratio, the grounds may not be fully saturated. You will see dry spots, and those spots will not extract properly. On the other hand, if you use too much water, you risk over-wetting and losing heat. The 2:1 ratio is a safe starting point, but adjust based on the coffee and your equipment.
Bloom Timing Across Different Brewers
Different brewers call for different bloom techniques. Here is a quick guide based on what I have found works best:
- Pour-over (V60, Chemex, Kalita): Use a 2:1 ratio, bloom for 30-45 seconds, then pour in stages. Stir if needed.
- French press: Pour the bloom water, stir gently, wait 30 seconds, then add the rest of the water. The bloom helps release gas before the long steep.
- Aeropress: Bloom for 15-20 seconds with a quick stir, then top up and press. The shorter bloom works because the immersion time is brief.
- Espresso: The bloom is built into the pre-infusion phase. Most modern espresso machines let you control pre-infusion time and pressure. For home machines, a 5- to 10-second pre-infusion can mimic the bloom.
Each method has its own rhythm, but the principle is the same: give the gas a chance to escape before you push water through the grounds. If you are new to a particular brewer, start with the standard bloom time and adjust based on taste.
How Freshness Affects the Bloom
Freshness is the single biggest variable in the bloom. Coffee that is less than a week old will have a massive, active bloom. Coffee that is a month old will barely fizz. That does not mean old coffee is undrinkable, but it does mean you need to adjust your approach.
For very fresh coffee, I extend the bloom to 45 or 60 seconds. I also use a slightly coarser grind to slow down extraction, because the gas can cause the water to stall. For older coffee, I shorten the bloom and grind finer to compensate for the loss of volatile compounds. The goal is to match the bloom to the coffee's condition, not to follow a rigid rule.
One way to test freshness is to feel the bloom. If the crust rises quickly and bubbles vigorously, the coffee is fresh. If it barely moves, the coffee is older. You can also smell the bloom. Fresh coffee releases a powerful aroma of fruit, chocolate, or floral notes. Older coffee smells more flat or papery. Trust your senses.
Finding Your Own Bloom Routine
The sessioncoffeedenver coffee bloom guide recommends starting with the standard 2:1 ratio and 30-second bloom, then dialing in from there. That is solid advice because it gives you a baseline. From that baseline, you can adjust the time, ratio, and temperature based on the coffee and your taste.
I keep a small notebook where I jot down bloom observations for each new bag of coffee. I note the roast date, the bloom activity, and how the final cup tastes. Over time, patterns emerge. For example, I have learned that Ethiopian natural-process coffees tend to bloom more vigorously than washed Colombians. I also know that darker roasts need a shorter bloom to avoid over-extraction. That kind of record keeping takes five minutes but pays off in consistency.
Another tip is to pre-wet your filter and warm your brewer before the bloom. A cold brewer steals heat from the water, and that heat loss can slow the bloom. If your bloom water drops below 190 degrees, the gas release slows down, and you lose extraction power. A quick rinse with hot water solves that problem.
The sessioncoffeedenver coffee bloom guide also emphasizes the importance of water quality. If your water is too hard or too soft, the bloom can behave differently. Hard water contains minerals that buffer pH and can slow extraction. Soft water extracts faster but can taste flat. If you are struggling with the bloom, check your water first. A simple filter or a jug of spring water can make a noticeable difference.
I have been brewing coffee at home for over a decade, and the bloom is still the part I pay the most attention to. It is the first sign that the coffee is alive. It tells me whether the beans are fresh, whether my grind is right, and whether my water is hot enough. Getting the bloom right sets the stage for everything else. If the bloom is wrong, no amount of fancy pouring or stirring will fix it.
Session Coffee Denver builds its approach around that idea. The team there treats the bloom as a diagnostic tool, not just a step. That is why the sessioncoffeedenver coffee bloom guide focuses on observation and adjustment. It is not about following a formula. It is about understanding what the coffee is telling you and responding to it.
If you are just starting out, do not overthink it. Use the standard ratio, watch the bloom, and taste the result. Then change one variable at a time. Shorten or lengthen the bloom. Use hotter or cooler water. Stir or skip the stir. Each change teaches you something about the coffee and your own preferences.
The bloom is a small moment in the brewing process, but it holds a lot of information. Pay attention to it, and your coffee will improve faster than you expect.
Follow Session Coffee Denver on
 Pinterest